Friday, November 14, 2008

It's been a little while

Sorry for the slowness in post activity... college has me up to my eyes in work to be done, leaving me with little time to update here!


As mentioned before... I made a accordion-fold book with different sushi and patterned backgrounds. Ink with colored pencils.


These are some of the things I am selling at my college's holiday sale.. hand bound sketchbooks, earrings, printed cards, rings and broaches

Lastly, a ink painting of students in my class. Higgins and Indian ink, on watercolor paper.

Tuesday, September 23, 2008

Art post

Art post, Random drawings from the past few weeks

Hawaii bird, colored pencil

Painting of my Buddha statue, ink and watercolor

Fish painting, ink and watercolor


Monday, September 8, 2008

Hawaii photos, round two

I did a lot of snorkeling on the trip, as Hawaii has some very beautiful clear waters. However the cheap underwater cameras managed to only take cloudy pictures that didn't represent the beauty of the ocean. We stopped at the Maui aquarium where I took some clearer photos.


Tuesday, August 12, 2008

aloha aloha!

So you may have noticed the lack of updates for a week or two, and that is because I was in Hawaii for two weeks! But now I am back, with a tan and lots of beautiful pictures!


          A beautiful flower near a waterfall in Maui. Called a "Torch Ginger" They have large 5 foot stems

Wild rooster! There were lots of wild chickens and roosters on the island. Called a "Jungle fowl cock" these animals really have no predators, not even people, as they are apparently very tough and not of a good quality for eating.

This is a adolescent version of the "common myna" bird... these guys were everywhere... trying to swindle food out of tourists, and squawking loudly. This little guy didn't seem to know much better and so I got pretty close to him as he stared inquisitively at me.

There were lots of wild cats on the islands too! this little fella was just sitting out in a state park... mewing loudly, looking for the rest of his clan. He didn't run away from me, but he wouldn't let me get close to him.

The smallest little lizard I saw at a botanical garden. This little guy was about the size of my whole thumb!

A Mongoose! I was out eating lunch next to this little waterfall, and a couple of these guys were scurrying around in the grasses nearby. I managed to coax him out with a bit of bread off of my sandwich.


It was truly a pleasure to observe the beauty of so many unfamiliar birds


That's all for now

Wednesday, July 9, 2008

Weekly art post: Drawings

Weekly art post!


"Sleep" Drawing that I did last semester at school.... full view and a close up. Mechanical pencil.

Drawing in progress... I still have to finish the background, the full thing will be posted then. Mechanical pencil.

Another school assignment, Never finished this, as a circus scene it needs a background of a crowd etc. I may redo this if I find the time. Charcoal

Mixed media collage, ink gouche and tissue paper
Simple drawing I did at a party. markers and colored pencil.


Thats it for this week, more coming next week, and keep an eye out, I think I'm going to start posting for Illustration Friday

Criticism and critique always welcome

Tuesday, February 26, 2008

Art on the go


I find that having A little journal everywhere I go to be essential. To catch my ideas and things that Inspire me when I am struck with them. Living in the city I spend a lot of time on trains and on the subway, and I can't always lug around a larger sketchbook (my current one is 15 in. by 11 in.) Having a small on-the-go sketchbook is wonderful. I can jot down ideas, things that inspire me, projects that I want to do, and just draw from life.

It's a great thing to have, especially if you're like me and can go a little stir-crazy when you are hit with an idea and have nothing to draw on. So, for example, I present to you my current little journal, with a little art to go along with it.


Along with my journal, I have a little set of tiny markers that I bought at a book store (used to draw the faces above), and through the times the package that they came in broke, so I made a little felt bag for them to stay together in my purse.

Wednesday, February 6, 2008

Crafty technique: Marbling


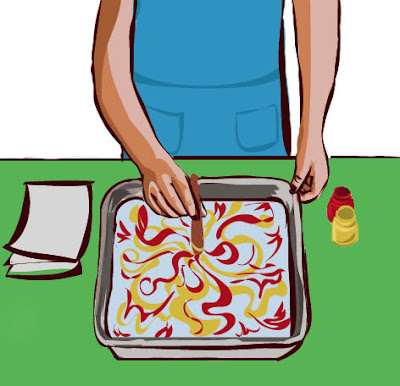
Marbling, is a technique I used when I did a summer camp thing for kids at an art store I used to work for, and I think it's a useful little thing to do for interesting designs in projects. I like to use it for decorating small surfaces, and for making decorative papers. I will give instruction for both.

1.) Marbling small surfaces

Supplies:
  • Surface you want to decorate (I like to use the cheap little wooden boxes you can get at craft stores)
  • Largish container that has some depth, filled with a couple of inches of water
  • Toy car paints (modeling paints, a liquid paint that pours easily, and is oil based, so that it will float on the water)
  • Something disposable to stir with (plastic utensil, Popsicle stick, etc)
  • Rubber gloves (not 100% necessary, but oil paint is toxic and it's good to be cautious, especially if you are going to be exposed to it for a long period of time)
Make sure you have a protected surface, and a well ventilated area to work in.
Pick your desired colors and pour a little amount on top of the water, and then stir! You will be able to make lots of swirl patterns, experiment to see what you like with colors, and how much you swirl the paint around. When you have something you'd like to transfer onto another surface, just gently place the flat surface to the top of the water on top of the design, lift and ta-da. Set to dry.


2.) Marbling with paper

Supplies

  • All that is listed above, plus blank paper for decorating, and a little turpentine to thin down the paint (you can use Turpenoid as a substitute, a odorless less toxic paint thinner).
  • Thicker paper is better, as it will resist absorbing too much water, and won't warp as much.
Thin down the paint with a little thinner before putting it into the water.
Hold the paper so that the middle of it touches the surface of the water first, then press the rest of the sides to the surface, remove promptly. Lay flat to dry.
It might take a few times to perfect the timing, but the imperfections will add uniqueness to the paper.
Make sure to press the paper under some heavy books (once it has dried) to flatten it out.


And there you go! I wish I had some picture examples of things that I have made, but It's all at my parent's house at the moment, and I don't have any of the paints left over so I haven't been able to do any of this while at school. You'll just have to trust me, and hopefully my low quality little Illustrator drawing at the top provides some sort of reference for you. Comment or email with any questions.

Tuesday, February 5, 2008

class drawing

A current class assignment is a book cover illustration of one of two subjects, Tutankhamen and Mozart. We are in the process of doing thumbnails and for next week we need expanded in-depth sketches of work with research on the subjects, I will probably post the finished piece in the coming weeks. for now, I will leave you with a picture of my shadow study drawing of a still life bust (done with mechanical pencil)

Sunday, January 20, 2008

Food love: Eggplant


I find eggplant to often be an unappreciated and ignored vegetable, so today I wanted to share some lovely recipes and uses for this tasty veggie.

Something I really found interesting was how many people I talked to whom have never tried eggplant were actually scared away of trying it because of how it looks! I can understand that when you give it a curious squeeze in the grocery store it's leathery feel, strange shape and dark color can through you off, but do not be deceived! This is a delicious and healthy food, with lots of uses in meals.

First a few food facts: Many millions of acres across the world are dedicated to growing these dark vegetables, china being the largest producer. Health wise, Eggplant can block free radicals from forming in the body, help control cholesterol levels and contains folic acid and potassium.


My favorite way to prepare it is to slice it into quarter inch long round slices, and then place those into a skillet with a few tablespoons of olive oil, frying on each side until soft and slighty brown. Then place on paper towels to absorb the extra oil, and sprinkle with salt and pepper.

For a healthier alternative, brush eggplant slices with olive oil and then bake for about 15 minutes, flipping halfway through.

You can throw these slices into any pasta dish, they are delicious additives to salad, cooked on top of pizza, and can even be put into sandwiches. Breading eggplant and then frying it is another option, if you prefer the taste. Now let me share with you one of my favorite eggplant pasta dishes:

EGGPLANT PASTA (serves 4-5 people)

  • 2-3 small baby eggplants
  • 2 large cans of whole peeled plum tomatoes (with basil)
  • 3-4 cloves of garlic
  • 1/2 cup Parmesan cheese
  • plenty of olive oil (for frying)
  • pasta of choice

1.) Fry eggplant, as instructed above, set aside.
2.) Pour a tablespoon of olive oil in large pan, saute garlic, then add tomato cans (cut up tomatoes into edible pieces with spatula) bring to boil, lower and simmer for about 20-25 mins.
3.) Meanwhile, cook chosen pasta (I personally prefer penne rigate)
4.) Add cooked eggplant to sauce, plus parmesan cheese, let simmer for another 5-10 minutes.
5.) salt and pepper to taste, put pasta in large serving tray, pour sauce on top, serve.

Now this recipe is one my whole family loves, and we always have seconds. It's a delicious, relatively easy to prepare, and a really nice and warm comforting food.


And finally HERE is a good little website with a bunch of other Eggplant recipes to try, so you can find your favorite way to enjoy this fantastic veggie. Enjoy~


****picture copyright Mariessa D 2008