Marbling, is a technique I used when I did a summer camp thing for kids at an art store I used to work for, and I think it's a useful little thing to do for interesting designs in projects. I like to use it for decorating small surfaces, and for making decorative papers. I will give instruction for both.
1.) Marbling small surfaces
Supplies: - Surface you want to decorate (I like to use the cheap little wooden boxes you can get at craft stores)
- Largish container that has some depth, filled with a couple of inches of water
- Toy car paints (modeling paints, a liquid paint that pours easily, and is oil based, so that it will float on the water)
- Something disposable to stir with (plastic utensil, Popsicle stick, etc)
- Rubber gloves (not 100% necessary, but oil paint is toxic and it's good to be cautious, especially if you are going to be exposed to it for a long period of time)
Make sure you have a protected surface, and a well ventilated area to work in.
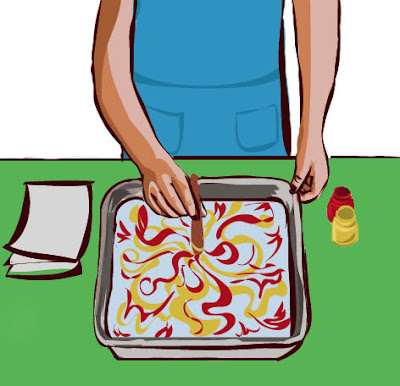
Pick your desired colors and pour a little amount on top of the water, and then stir! You will be able to make lots of swirl patterns, experiment to see what you like with colors, and how much you swirl the paint around. When you have something you'd like to transfer onto another surface, just gently place the flat surface to the top of the water on top of the design, lift and ta-da. Set to dry.
2.) Marbling with paper
Supplies
- All that is listed above, plus blank paper for decorating, and a little turpentine to thin down the paint (you can use Turpenoid as a substitute, a odorless less toxic paint thinner).
- Thicker paper is better, as it will resist absorbing too much water, and won't warp as much.
Thin down the paint with a little thinner before putting it into the water.
Hold the paper so that the middle of it touches the surface of the water first, then press the rest of the sides to the surface, remove promptly. Lay flat to dry.
It might take a few times to perfect the timing, but the imperfections will add uniqueness to the paper.
Make sure to press the paper under some heavy books (once it has dried) to flatten it out.
And there you go! I wish I had some picture examples of things that I have made, but It's all at my parent's house at the moment, and I don't have any of the paints left over so I haven't been able to do any of this while at school. You'll just have to trust me, and hopefully my low quality little Illustrator drawing at the top provides some sort of reference for you. Comment or email with any questions.

 Here he is after being freshly baked
 paint time!
 Ready for adventures!


